Growing up, street stalls served these paneer cutlets hot and crispy, the aroma of spices mingling with fried batter. Recreating that at home feels like capturing a piece of childhood chaos—messy, joyful, and totally worth it. It’s funny how a simple snack can carry so much nostalgia, even if it’s just for a quiet weekend lunch.
There’s something about the process that’s a little chaotic—the way the paneer softens inside while the outside crisps up to a perfect golden hue. I love how unpredictable it can be, with each batch turning out just a little different, but always satisfying. It’s a messy, honest kind of cooking that reminds me why I started making street food at home in the first place.
Focusing on how paneer cutlets can be a nostalgic street food recreated at home, blending crispy exterior with the soft, milky interior, and the little chaos of perfecting that golden crust.
Street Food Nostalgia
- Making these at home reconnects me to childhood, when street vendors would fry them up in busy markets.
- The smell of spices and frying paneer always sparks a rush of nostalgia and a longing for simple joys.
- I love how each batch turns out a little different—sometimes crispy, sometimes more tender—and that unpredictability keeps me hooked.
- Sharing these with friends feels like recreating a communal street food moment, even if we’re just in my tiny kitchen.
The story behind this recipe
- This recipe was born out of a lazy weekend craving for street-style snacks, but with a twist—using fresh paneer I had in the fridge instead of the usual deep-fried street version. It’s funny how a simple idea can turn into a messy experiment that ends up tasting just right, crispy on the outside and soft inside. I like that it’s forgiving, imperfect, and honest—like a good home cook’s project should be.
- I remember the first time I tried making these for a small gathering. The kitchen was chaos—spices flying, oil crackling, and the smell of toasted paneer filling the air. That moment of flipping a perfect, golden cutlet made me realize how satisfying simple ingredients can be when treated with a bit of love and patience. Now, it’s become my go-to for casual dinners and spontaneous snack attacks.
- heading: ‘The story behind this recipe’
Historical and Cultural Trivia
- Paneer cutlets likely originated from street food vendors in North India, where quick, satisfying snacks are a staple.
- The fusion of crispy exterior and soft paneer inside reflects a clever adaptation of traditional cutlets, blending Indian flavors with snackable street style.
- Historically, these cutlets were made as a vegetarian alternative to meat-based snacks, making them accessible and beloved across different communities.
Key ingredients and tips
- Paneer: I prefer using fresh, soft paneer that still feels milky and tender. Skip the overly firm kind, or your cutlets risk being too dense and rubbery.
- Breadcrumbs: I like panko for extra crunch, but regular fine breadcrumbs work fine. Toast them lightly before mixing for a nuttier flavor and better adhesion.
- Spices: Garam masala, cumin, and coriander are my go-tos. Adjust to your taste—adding a pinch more garam masala gives a warm, aromatic punch.
- Green chilies: Use finely chopped fresh chilies—they add a lively heat that’s not overwhelming, but you can skip or reduce if you prefer milder bites.
- Binding agents: I mix in a little chickpea flour or mashed potatoes for better hold. If the mixture feels too sticky, sprinkle in more flour gradually until it’s scoopable but not dry.
- Oil: For frying, I prefer a neutral oil with a high smoke point like sunflower or canola. Keep the oil shimmering but not smoking for that perfect crispy crust.
- Lemon juice: I love a squeeze of fresh lemon for brightness—this makes the flavors pop and balances the richness of the paneer. Skip if you want a milder taste.
Spotlight on key ingredients
Paneer:
- I love using fresh, soft paneer that still feels milky and tender. It melts slightly when cooked, creating a creamy interior that contrasts beautifully with the crispy exterior. Avoid overly firm or crumbly paneer, or your cutlets might turn rubbery.
- Paneer also absorbs spices and flavors well, so the more aromatic and spicy your mixture, the more the paneer will soak up that goodness during frying.
Breadcrumbs:
- I prefer panko for that extra crunch, but traditional fine breadcrumbs work just as well. Toast them lightly before mixing to deepen the flavor and help the coating stick better, giving your cutlets a satisfying crispy bite.
- The texture of breadcrumbs influences the crust—coarser ones give more crunch, while finer ones create a smooth, golden shell. Both should be evenly coated for that perfect fry.
Notes for ingredient swaps
- Dairy-Free: Use tofu or mashed potatoes instead of paneer for a similar texture, but expect a milder flavor.
- Gluten-Free: Swap regular breadcrumbs for crushed cornflakes or gluten-free panko to maintain crunch.
- Spice Level: Reduce or skip green chilies if you prefer milder cutlets, or add a touch more for extra heat.
- Herbs & Flavors: Fresh coriander can be replaced with dried herbs like oregano or thyme for a different aroma.
- Binding Agents: If chickpea flour isn’t available, use mashed cooked lentils or a bit of mashed sweet potato—watch moisture levels.
- Oil: For a lighter version, bake the cutlets at 200°C (392°F) for 20-25 minutes, flipping halfway, until golden.
- Lemon Juice: Use a splash of vinegar or a dash of tamarind paste to add brightness if lemon isn’t on hand.
Equipment & Tools
- Mixing bowl: Combine ingredients and knead the mixture.
- Flat plate: Coat cutlets with breadcrumbs evenly.
- Frying pan: Cook the cutlets with even heat, achieving crispy crust.
- Slotted spoon: Turn and remove cutlets from hot oil safely.
Step-by-step guide to paneer cutlets
- Equipment & Tools: Gather a mixing bowl (to combine ingredients), a flat plate (for breading), a frying pan (to cook), and a slotted spoon (for turning and removing cutlets).
- Crumble the paneer: Break the paneer into small pieces, then mash it with a fork until crumbly but not pasty, about 2 minutes.
- Mix ingredients: Add chopped green chilies, cumin, coriander, garam masala, salt, and lemon juice to the paneer. Mix well, about 3 minutes, until evenly combined.
- Bind the mixture: Sprinkle in chickpea flour or breadcrumbs gradually, kneading gently to form a soft, workable dough. If too sticky, add more flour; if too dry, a splash of water.
- Shape cutlets: Divide the mixture into 8 equal portions. Roll each into a ball, then flatten into a patty about 1.5 cm (0.6 inch) thick. Keep them uniform for even frying.
- Prepare for frying: Place breadcrumbs on a plate. Lightly coat each cutlet by pressing both sides into the breadcrumbs, ensuring an even layer.
- Heat oil: Pour enough neutral oil into the pan to cover the bottom, about 1/2 inch deep. Heat over medium heat (about 160°C/320°F). When shimmering, it’s ready.
- Fry cutlets: Carefully place 2-3 cutlets in the hot oil. Fry for 3-4 minutes per side, until golden brown and crispy. Adjust heat if oil smokes or browns too fast.
- Flip and finish: Use a slotted spoon to turn the cutlets. Cook until both sides are crispy, with a rich aroma. If they brown too quickly, lower the heat.
- Drain: Remove from oil and place on paper towels to absorb excess oil. Rest for 2 minutes to firm up and avoid sogginess.
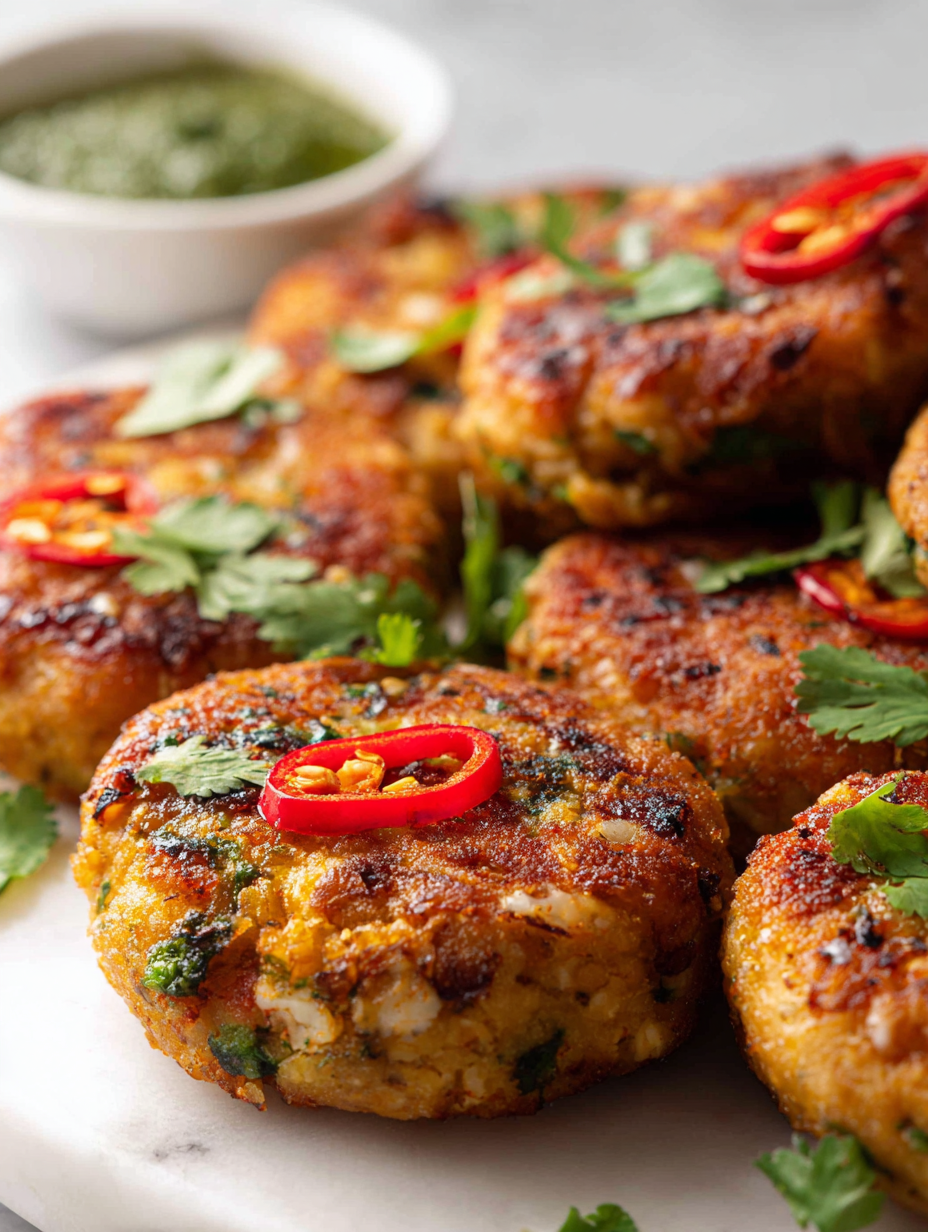
- Serve: Plate the cutlets hot, with lemon wedges or chutney. Enjoy the contrast of crispy exterior and soft, flavorful interior.
Let the cutlets rest for 2 minutes on paper towels before serving. Plate them with a squeeze of lemon or your favorite chutney for added brightness.
How to Know It’s Done
- Golden brown crust with a crispy exterior
- Paneer inside feels soft but firm, not mushy
- Oil crackles gently when cutlets are added, no excessive smoking
Paneer Cutlets
Ingredients
Equipment
Method
- Crumble the paneer into a large mixing bowl, breaking it up into small, crumb-like pieces with your fingers or a fork. This creates a soft base for mixing in spices.
- Add the finely chopped green chili, cumin powder, coriander powder, garam masala, salt, and lemon juice to the paneer. Mix everything together thoroughly, letting the spices coat the paneer evenly and fill the air with fragrant aromas.
- Sprinkle in the chickpea flour gradually, kneading the mixture gently with your hands until it becomes a soft, cohesive dough that holds together when shaped. If it feels too sticky, add a little more chickpea flour; if too dry, sprinkle in a tiny splash of water.
- Divide the mixture into four equal portions. Roll each portion into a ball, then flatten gently into a patty about 1.5 cm thick, shaping them into neat, round cutlets.
- Pour the breadcrumbs onto a flat plate. Take each cutlet and press both sides into the breadcrumbs, coating them evenly with a crunchy, golden layer. This prepares them for frying with a crispy exterior.
- Heat enough oil in a frying pan over medium heat until it shimmers gently—this is the ideal temperature for frying. When ready, carefully add 2-3 cutlets and listen for a gentle crackle as they hit the hot oil.
- Fry the cutlets for about 3-4 minutes on each side, turning occasionally with a slotted spoon, until they are deep golden brown and crispy. The aroma of spices and frying paneer will fill the air.
- Use a slotted spoon to remove the cooked cutlets from the oil and place them on paper towels to drain excess oil. Rest for a couple of minutes to keep them crispy and avoid sogginess.
- Serve the hot, crispy paneer cutlets with lemon wedges or your favorite chutney, enjoying their crunchy exterior and soft, flavorful interior in every bite.
Tips for perfect paneer cutlets
- Bolded Mini-Head: Use a gentle hand when pressing breadcrumbs onto the cutlets to ensure an even, crispy coating.
- Bolded Mini-Head: Keep the oil at a steady shimmer—if it’s smoking, your crust might burn before cooking through.
- Bolded Mini-Head: Rest the cutlets on paper towels after frying—this keeps them crispy and prevents sogginess from excess oil.
- Bolded Mini-Head: When frying, don’t overcrowd the pan; give each cutlet space to cook evenly and crisp up beautifully.
- Bolded Mini-Head: For a brighter flavor, squeeze fresh lemon just before serving—this lifts the richness of the paneer.
- Bolded Mini-Head: If the mixture feels too sticky, sprinkle in a little extra breadcrumbs or chickpea flour to help shape the cutlets.
- Bolded Mini-Head: To test for doneness, look for a deep golden color and listen for a gentle crackle when you flip.
Common mistakes and how to fix them
- FORGOT to dry paneer thoroughly → results in soggy cutlets, pat dry before mixing.
- DUMPED all spices at once → spice unevenly, add gradually, taste and adjust seasoning.
- OVER-TORCHED oil → bitter flavor, keep heat moderate, oil should shimmer, not smoke.
- MISSED resting time → cutlets become greasy, rest on paper towels 1-2 minutes before serving.
Quick fixes and pantry swaps
- When oil shimmers but smokes → lower heat immediately to prevent bitterness.
- If cutlets break apart when frying → chill the mixture for 15 minutes to firm up.
- Splash water on hot oil → to calm splatters and reduce crackling noise.
- Patch soggy coating with a quick sprinkle of fresh breadcrumbs and re-fry for crunch.
- Shield delicate cutlets from direct flame → tilt pan to prevent burning, shimmer is key.
Prep, store, and reheat tips
- Prepare the paneer mixture a day in advance; keep covered in the fridge to let flavors meld and develop. The aroma becomes richer overnight.
- Shape and bread the cutlets ahead of time, then store them un-fried in an airtight container in the fridge for up to 24 hours. The coating stays crisp if kept dry.
- Fried cutlets can be kept in the fridge for 1-2 days; reheat in a hot oven (190°C/375°F) for 8-10 minutes until crispy and warmed through, with a subtle crackle.
- Reheating in the microwave is quick but may soften the crust. To restore crunch, give them a quick blast in a hot skillet or oven for a few minutes.
- The flavors deepen slightly the next day, but the texture may soften. Best enjoyed fresh, but still tasty after a gentle reheat with crispy edges.
Top questions about paneer cutlets
1. Can I use store-bought paneer?
Use fresh, soft paneer that still feels milky and tender. Avoid overly firm or crumbly varieties to keep the texture light and creamy.
2. What’s a good substitute for breadcrumbs?
Yes, you can swap breadcrumbs with crushed cornflakes for extra crunch, or use gluten-free panko for a lighter coating.
3. Can I make these milder?
Green chilies add a lively heat and freshness; use finely chopped fresh chilies. Skip or reduce if you prefer milder flavors.
4. What oil is best for frying?
Use a neutral oil like sunflower or canola. Keep the oil shimmering but not smoking for the perfect crispy crust.
5. How do I know when they’re cooked?
Shape the mixture into even patties, then coat with breadcrumbs. Fry in hot oil until golden and crispy, about 3-4 minutes each side.
6. Should I rest the cutlets before serving?
Rest fried cutlets on paper towels for a couple of minutes to absorb excess oil and keep them crispy.
7. How do I store leftovers?
To make ahead, form and bread the cutlets then refrigerate for up to 24 hours before frying. Reheat in the oven for best texture.
8. What if the coating gets soggy?
If oil smokes or burns, lower the heat immediately. For soggy coating, re-fry briefly or sprinkle with fresh breadcrumbs and crisp up again.
9. How hot should the oil be?
Ensure the oil is hot enough—shimmering but not smoking—before frying to get that crispy exterior without burning.
10. Can I add herbs or spices?
Use lemon juice or a splash of vinegar to brighten the flavor before serving. Fresh herbs like coriander add freshness.
Recreating street-style paneer cutlets at home isn’t just about the crispy crust or soft interior; it’s about capturing a moment of nostalgia, a little chaos in the kitchen, and that satisfying feeling of turning simple ingredients into something special. These cutlets remind me of bustling markets and carefree weekends, where the smell of spices and frying paneer filled the air.
No matter how many batches I make, each one turns out just a little different—sometimes crispier, sometimes softer—and that’s part of the charm. They’re perfect for spontaneous snacks or laid-back dinners, especially when you want something comforting but with a bit of crunch. Honestly, that imperfect, honest process keeps me coming back for more.