
Turning leftover vegetables into crunchy, satisfying bites feels like a small victory in my kitchen. It’s a way to avoid waste and squeeze more flavor out of what I already have. Plus, there’s something satisfying about transforming humble produce into a snack everyone can reach for.
These baked veggie chips aren’t just about saving scraps—they’re about making a snack that’s fresh, crispy, and full of character. I love experimenting with different veggies, from sweet carrots to earthy beets, and each batch feels like a little culinary adventure. It’s honest, practical, and a reminder that good snacks don’t have to come from a bag.
In the chaos of busy days, I reach for these chips with a sense of pride. They’re quick to toss together, and I get to feel good about what I’m eating. Plus, the aroma of roasted vegetables turning crispy is a comforting smell that fills my kitchen with a cozy, inviting vibe.
Focusing on how to turn humble, leftover vegetables into a crispy, satisfying snack that reduces waste and elevates everyday ingredients.
The story behind this recipe
- I started making these veggie chips one afternoon when I was knee-deep in a fridge full of odds and ends that needed using up. The kitchen smelled like roasted earth and sweet peppers, and I realized how satisfying it was to turn scraps into something crispy and snackable. That moment made me see leftover vegetables in a new light—potential, not waste.
- Over the years, I’ve played with different veggies—carrots, zucchini, sweet potatoes—and each batch feels like a small, imperfect victory. It’s honest cooking, turning simple ingredients into a snack that’s both wholesome and addictive. I love how a sprinkle of sea salt and a dash of smoked paprika can totally elevate the flavor.
- These chips remind me that good food doesn’t need fancy ingredients. Sometimes, it’s just about making the most of what’s in the fridge, and the smell of roasting veggies crackling in the oven is a cozy, welcoming scent I always look forward to.
Ingredient breakdown: key components
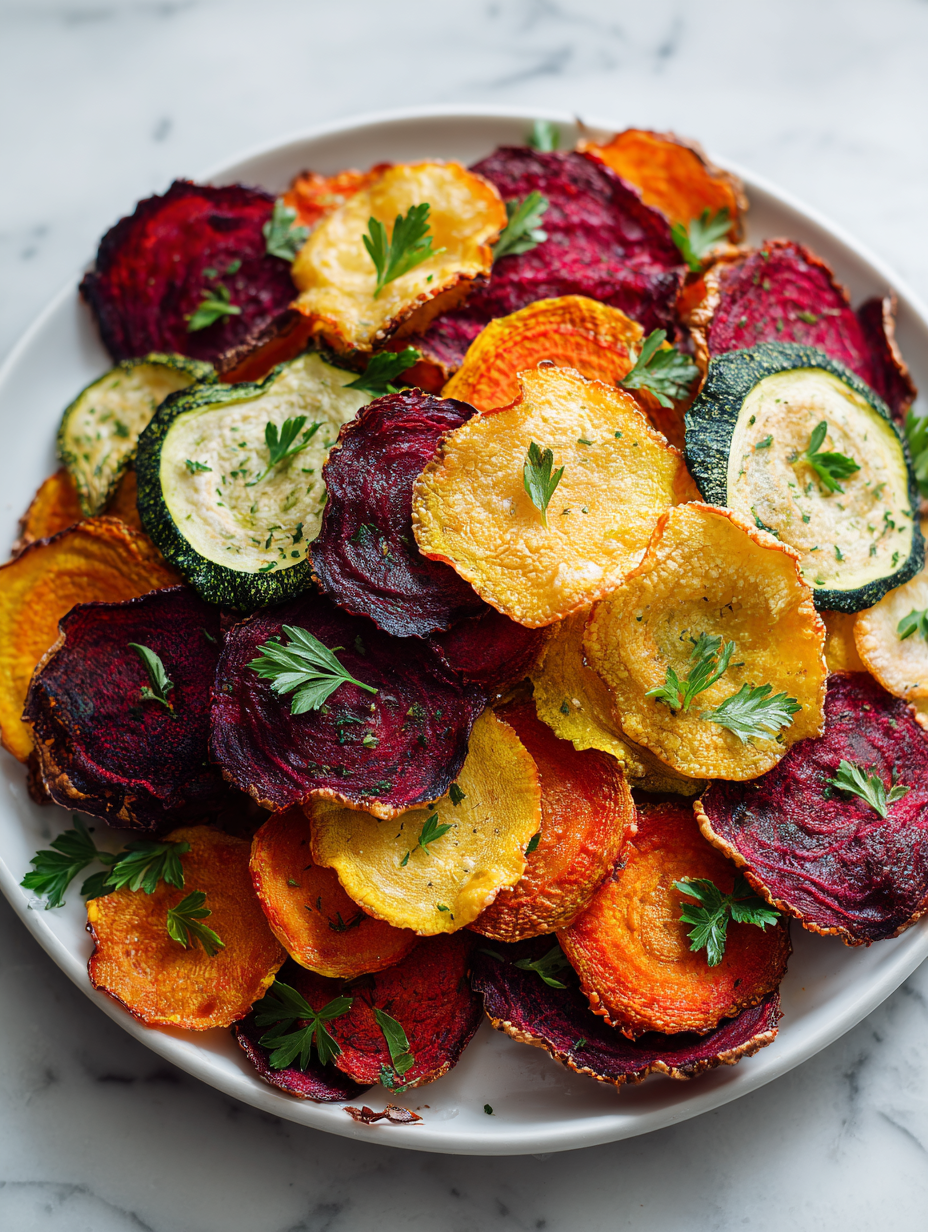
- Sweet potatoes: I love their natural sweetness and vibrant orange color, which crisps up beautifully—try a thinner slice for extra crunch.
- Zucchini: It’s a bit more delicate, so I recommend salting and patting dry before baking to avoid sogginess, plus it offers a fresh, almost grassy flavor.
- Beets: Their earthy richness turns into a smoky note when roasted; slicing them evenly helps them crisp uniformly, and the deep magenta hue is so striking.
- Carrots: I find their subtle sweetness makes for a bright, crunchy snack—cut thin and watch closely so they don’t burn.
- Olive oil: Just a light drizzle coats the veggies, helping them crisp and adding a glossy finish—use a good quality one for depth of flavor.
- Salt: A pinch of flaky sea salt at the end enhances the natural flavors, but don’t skip this step—sometimes simple is best.
- Paprika or spices: A dash adds warmth and color, but you can customize with cumin, chili powder, or herbs—play around to match your mood.
Spotlight on key ingredients
Root Vegetables:
- Sweet potatoes: I love their natural sweetness and vibrant orange color, which crisps up beautifully—try a thinner slice for extra crunch.
- Zucchini: It’s a bit more delicate, so I recommend salting and patting dry before baking to avoid sogginess, plus it offers a fresh, almost grassy flavor.
- Beets: Their earthy richness turns into a smoky note when roasted; slicing them evenly helps them crisp uniformly, and the deep magenta hue is so striking.
Seasoning & Oil:
- Olive oil: Just a light drizzle coats the veggies, helping them crisp and adding a glossy finish—use a good quality one for depth of flavor.
- Salt: A pinch of flaky sea salt at the end enhances the natural flavors, but don’t skip this step—sometimes simple is best.
- Spices: A dash adds warmth and color, but you can customize with cumin, chili powder, or herbs—play around to match your mood.
Notes for ingredient swaps
- Dairy-Free: Use coconut oil instead of olive oil. It adds a subtle tropical aroma and crispness.
- Low-Sodium: Skip the added salt or replace with a salt-free seasoning blend for a milder flavor.
- Vegan: Ensure any added spices or toppings are plant-based; avoid honey-based glazes or dairy-based seasonings.
- Spicy Kick: Swap paprika with chili powder or cayenne pepper for a fiery twist that still crisps well.
- Herb Variations: Use dried rosemary or thyme instead of spices for an aromatic, earthy flavor.
- Sweet Veggie Swap: Incorporate thinly sliced sweet potatoes or carrots for a sweeter, richer chip.
- Extra Crunch: Add a sprinkle of nutritional yeast before baking for a cheesy, umami boost.
Equipment & Tools
- Oven: To bake the veggie slices until crispy.
- Baking sheet: Provides a flat surface for baking; line with parchment for easy cleanup.
- Mandoline or sharp knife: To slice veggies uniformly for even cooking.
- Pastry brush or spray bottle: To lightly coat slices with oil.
- Cooling rack: To let chips cool and crisp up after baking.
Step-by-step guide to veggie chips
- Preheat your oven to 180°C (350°F). Line a baking sheet with parchment paper. Gather your vegetables and a sharp knife or mandoline for slicing. Have a small bowl of olive oil and some sea salt ready.
- Thinly slice vegetables: Aim for about 1/8 inch (3 mm). Consistent thickness helps them cook evenly. Use a mandoline for uniform slices—no uneven chips!
- Lay slices in a single layer on the prepared baking sheet. Avoid overlapping; crowded veggies won’t crisp properly. If needed, use two sheets.
- Lightly brush or spray the slices with olive oil. Sprinkle with a pinch of sea salt. For extra flavor, add spices like smoked paprika or cumin now.
- Bake for 15-20 minutes. Check around the 12-minute mark. Slices should be golden around the edges, with a slight curling. The smell of roasted veggies should fill your kitchen.
- a. If chips aren’t crisp after 20 minutes: turn up the heat slightly or broil for 1-2 minutes, watching closely to prevent burning. b. If they’re too dark or burnt, reduce oven temperature to 160°C (320°F) and bake longer. c. If slices stick or are uneven, lift and rearrange on the sheet.
- Remove chips from oven and let rest on a cooling rack for 5 minutes. They’ll crisp up further as they cool. Taste for seasoning and add more salt if needed.
- Plate the chips in a bowl or on a platter. Serve immediately for maximum crunch. Leftovers can be stored in an airtight container for a day or two, but they’re best fresh.
Let the chips rest on a cooling rack for 5 minutes. Serve immediately for best crunch. Store leftovers in an airtight container, but re-crisp in the oven at 160°C (320°F) for a few minutes before serving again.
How to Know It’s Done
- Color: edges are golden and crispy.
- Texture: chips are firm and crunch when you bite.
- Appearance: slices are evenly cooked and not soggy.
Crispy Baked Veggie Chips
Ingredients
Equipment
Method
- Preheat your oven to 180°C (350°F) and line a baking sheet with parchment paper.
- Using a mandoline or a sharp knife, thinly slice all the vegetables to about 1/8 inch (3 mm) thick for even crisping.
- Place the zucchini slices in a bowl, sprinkle with a pinch of salt, and let sit for 5 minutes to draw out excess moisture. Pat dry with a paper towel.
- In a large bowl, toss all the vegetable slices with olive oil until evenly coated, then sprinkle smoked paprika if using.
- Spread the slices in a single layer on the prepared baking sheet, making sure they don’t overlap for maximum crispness.
- Bake in the preheated oven for 15-20 minutes, checking around the 12-minute mark. The chips should turn golden at the edges and become crispy.
- Once baked, transfer the chips to a cooling rack and let them cool for 5 minutes. This helps them crisp up further and prevents sogginess.
- Sprinkle with a little sea salt to taste and serve immediately for the best crunch and flavor.
Notes
Pro tips for perfect veggie chips
- Use a mandoline for even slices and quick prep.
- Keep slices thin—about 1/8 inch—for maximum crispness.
- Rotate sheets halfway through baking to ensure uniform color.
- Check chips early—edges should be golden and curling.
- If chips stay soft, bump up oven temp slightly or broil briefly.
- Use high-quality olive oil for richer flavor and better crisping.
- Let chips cool on a rack to crisp up fully and prevent sogginess.
Common mistakes and how to fix them
- FORGOT to check oven temperature → Use an oven thermometer for accuracy.
- DUMPED slices too close → Arrange slices in a single layer, avoid overlapping.
- OVER-TORCHED chips → Reduce heat or bake for less time, watch closely near the end.
- MISSED dry veggies before baking → Salt and pat dry to prevent sogginess.
Quick fixes and pantry swaps
- When chips are soggy, splash with a little extra oil and bake 2 minutes longer.
- If chips stick, patch with parchment paper and flip slices for even crisping.
- Splash vinegar or lemon juice on veggies if oxidation darkens slices too quickly.
- When oven is uneven, rotate baking sheet halfway through to even out color and texture.
- DUMPED slices too close? Shake or rearrange to prevent sticking and promote crispness.
Prep, store, and reheat tips
- Pre-slice vegetables the night before and store in an airtight container in the fridge; they’ll stay fresh and ready for baking.
- Store baked chips in an airtight container at room temperature for up to 2 days; they remain crispy if kept dry and away from moisture.
- For longer storage, freeze cooled chips in a sealed bag for up to a week; reheat in a 160°C (320°F) oven until crisp, about 5 minutes, with a gentle crackle returning as they re-crisp.
- Reheating chips will revive some crispness but won’t be quite as fresh; serve soon after reheating for the best texture.
- If chips lose their crunch, a quick re-bake in a hot oven for a few minutes can bring back their snap and aroma.
Top questions about veggie chips
1. How thin should I slice the vegetables?
Use a very sharp knife or mandoline to get thin, even slices for crisp chips.
2. Should I pre-soak or blanch the veggies?
Pre-soaking root vegetables like beets helps reduce moisture and ensures crispiness after baking.
3. What oven temperature and baking time work best?
Bake at 180°C (350°F) and check around 15 minutes; chips should be golden and crisp.
4. Can I bake directly on a baking sheet without parchment?
Use parchment paper to prevent sticking and promote even baking; skip if you want extra crunch.
5. How should I store leftover veggie chips?
Store cooled chips in an airtight container for up to 2 days; reheat briefly for maximum crispness.
6. My chips are soft, what can I do?
If chips aren’t crispy, increase oven temperature slightly or broil briefly, but watch closely!
7. How much oil should I use?
Use high-quality olive oil for better flavor and crisping; a light coat is enough.
8. When should I add spices?
Mix spices into the oil before coating or sprinkle after baking for added flavor.
9. Can I use different vegetables?
Vary the veggies for different flavors and textures—sweet potatoes are extra sweet, beets smoky.
10. How do I avoid burning the chips?
Watch the chips closely near the end to prevent burning, especially if using high heat or broil.
Turning leftover vegetables into crispy chips feels like a small victory, especially when the aroma of roasting veggies fills my kitchen with warmth. It’s a simple way to reduce waste and turn humble ingredients into something snack-worthy and satisfying.
These chips remind me that good food is often about making the most of what’s in the fridge. Plus, they’re quick to whip up, making them a go-to for busy days or when I need a comforting, homemade crunch.