
Turning humble cassava into crispy, guilt-free chips feels like reclaiming a snack I thought I had to buy packaged and greasy. It’s honestly satisfying to see those thin slices turn golden and crackly in the oven, no deep-frying needed. Plus, the aroma of roasted cassava filling the kitchen is a good reminder that simple ingredients can deliver big on flavor.
This recipe is a small act of kitchen rebellion—no oil bath, just oven heat and a bit of patience. I love how versatile these baked chips are; they’re perfect for a quick snack or a crunchy topping for salads. Making them feels like a quiet win, especially when you get that perfect crispy edge without the mess and excess oil.
Focusing on turning humble cassava into crispy, guilt-free snack chips that satisfy that craving for crunch without the usual oil bath.
The story behind this recipe
- One rainy afternoon, I was peeling cassava to make a simple snack, and I got distracted by the way the kitchen filled with a sweet, earthy aroma. It reminded me of childhood, sitting on my grandmother’s lap while she fried plantains and cassava for us. I started thinking about how I could make that crispy, satisfying crunch without all the oil, just using the oven and a little patience.
- That moment sparked this idea—turning humble cassava into baked chips that are lighter but still crave-worthy. I love how they turn out—crispy, slightly smoky, and with a hint of sweetness from the natural cassava. It’s kind of a quiet victory, making a healthier snack that still feels indulgent.
- heading
- story_type
Key ingredients and tips
- Cassava: I love the earthy, slightly sweet aroma that fills the kitchen—makes me crave these chips even before baking. Swap with sweet potato if you want a milder, softer flavor, but the crispness might vary.
- Olive oil: Just a light brush adds a subtle richness and helps the edges crisp up beautifully. You could try coconut oil for a hint of tropical aroma, though it makes the chips a touch more fragrant.
- Sea salt: Enhances the natural flavor and gives that satisfying salty hit. If you prefer less sodium, a sprinkle of smoked paprika can add depth without extra salt.
- Black pepper: A grind of fresh pepper adds a gentle heat and complexity. For a smoky flavor, try a dash of smoked paprika or cayenne pepper—just a pinch.
- Optional spices (like garlic powder or chili flakes): I add these for a personal kick, especially if I want more punch. Use sparingly, as they can overpower the delicate cassava flavor, but the aroma should be inviting and lively.
- Lemon juice (optional): A splash brightens the flavor and balances the earthiness. Skip if you want a purer, more neutral chip, but it makes them feel fresh and zingy.
- Parchment paper: I always line my baking sheet for easy cleanup and even crisping. No swap needed here, but avoid greasing the sheet directly—stick to parchment for that perfect crunch.
Spotlight on key ingredients
Cassava:
- I love the earthy, slightly sweet aroma that fills the kitchen—makes me crave these chips even before baking. Swap with sweet potato if you want a milder, softer flavor, but the crispness might vary.
- Olive oil: Just a light brush adds a subtle richness and helps the edges crisp up beautifully. You could try coconut oil for a hint of tropical aroma, though it makes the chips a touch more fragrant.
- Sea salt: Enhances the natural flavor and gives that satisfying salty hit. If you prefer less sodium, a sprinkle of smoked paprika can add depth without extra salt.
Spices & citrus:
- Black pepper: A grind of fresh pepper adds a gentle heat and complexity. For a smoky flavor, try a dash of smoked paprika or cayenne pepper—just a pinch.
- Optional spices (like garlic powder or chili flakes): I add these for a personal kick, especially if I want more punch. Use sparingly, as they can overpower the delicate cassava flavor, but the aroma should be inviting and lively.
- Lemon juice (optional): A splash brightens the flavor and balances the earthiness. Skip if you want a purer, more neutral chip, but it makes them feel fresh and zingy.
Notes for ingredient swaps
- Fresh cassava: I prefer the earthy, slightly nutty flavor of fresh cassava for the crispiest chips. Frozen or pre-peeled options can be more convenient but may lose some texture.
- Olive oil: I use extra virgin for a fruity aroma and good crisping. You can swap with avocado oil for a milder flavor or neutral oils like canola, though the aroma will be less pronounced.
- Sea salt: I love the clean, mineral notes. For a different twist, try smoked salt for a smoky undertone or seasoned salts with herbs.
- Black pepper: Freshly ground gives the best aroma and bite. For a milder or different flavor, use white pepper or a pinch of crushed pink peppercorns.
- Spices (paprika, chili flakes): I add these for warmth and a smoky kick. Curry powder or cumin can add depth, but start with small amounts so as not to overpower the cassava’s natural sweetness.
- Lemon juice: A splash brightens the flavor and enhances freshness. Lime juice works similarly, adding a slightly different citrus note. Skip if you prefer a more neutral chip.
- Parchment paper: Essential for easy release and even crispness. Silicone baking mats are a good alternative, but avoid greasing the pan directly to prevent sogginess.
Equipment & Tools
- Mandoline slicer: Ensures uniform, thin slices for even baking.
- Large baking sheet: Holds all slices in a single layer for consistent crisping.
- Parchment paper: Prevents sticking and aids in even baking.
- Pastry brush: Applies a light, even coat of oil on slices.
Step-by-step guide to baked cassava chips
- Equipment & Tools: Gather a mandoline slicer for uniform slices, a large baking sheet, parchment paper, and a brush for oil.
- Preheat your oven to 180°C (350°F). Line the baking sheet with parchment for easy cleanup and crisping.
- Peel the cassava thoroughly, then slice as thin as possible using the mandoline. Aim for about 1/8 inch thickness, no thicker.
- Place sliced cassava in a bowl of cold water to remove excess starch. Rinse thoroughly, then drain and pat dry with a towel.
- Lightly brush both sides of each slice with olive oil. Sprinkle with sea salt and any optional spices like pepper or paprika.
- Arrange slices in a single layer on the prepared baking sheet, avoiding overlaps. Bake for about 15 minutes.
- Check the chips: they should be golden around the edges and slightly crispy. If not, bake for another 3-5 minutes, watching closely.
- Remove from oven and let rest on the sheet for 2 minutes to firm up. They will crisp up further as they cool.
- Transfer to a wire rack if needed to finish crisping. Serve warm or at room temperature, ideally within an hour for maximum crunch.
Let the chips rest on a wire rack for a few minutes to crisp up further. Serve immediately or store in an airtight container once cooled.
How to Know It’s Done
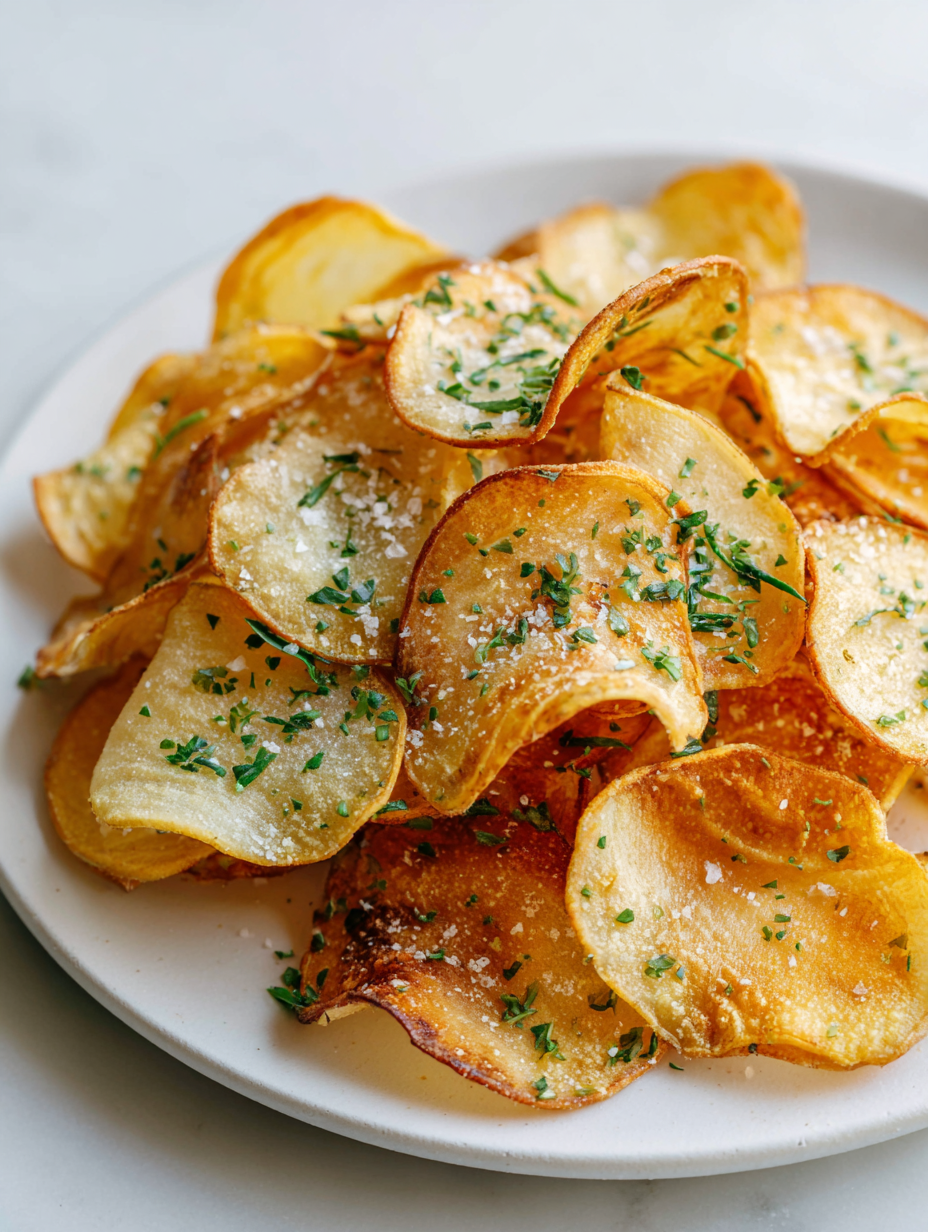
- Chips are golden and crispy around edges, with a slight crackle when broken.
- Surface is dry and evenly browned, not pale or soggy.
- The slices are firm yet tender, not limp or chewy.
Baked Cassava Chips
Ingredients
Equipment
Method
- Begin by peeling the cassava thoroughly, then use a mandoline slicer to cut it into very thin, even slices about 1/8 inch thick. The uniform slices will bake evenly and turn crispy.
- Place the sliced cassava in a bowl of cold water for a few minutes to remove excess starch. Rinse thoroughly to keep the chips crisp, then drain and pat dry with a clean towel.
- Preheat your oven to 180°C (350°F). Line a large baking sheet with parchment paper to prevent sticking and promote even crisping.
- Using a pastry brush, lightly coat both sides of each cassava slice with olive oil. This helps them turn golden and crispy as they bake.
- Arrange the slices in a single layer on the prepared baking sheet, making sure they don’t overlap. Sprinkle with sea salt, black pepper, and optional spices if desired for extra flavor.
- Bake in the preheated oven for about 15 minutes. Keep a close eye on them, as they should turn golden at the edges and become crisp. If needed, bake for an additional 3-5 minutes, but watch carefully to prevent burning.
- Remove the baking sheet from the oven once the chips are evenly golden and crackly. Let them rest for 2 minutes on the sheet to firm up further.
- Transfer the chips to a wire rack if desired to finish crisping. Drizzle with a splash of lemon juice for brightness, if using. Serve immediately for the best crunch.
Pro tips for crispy baked cassava chips
- Bolded mini-head: Thin, even slices are key → Use a mandoline to avoid uneven chips and ensure crispness.
- Bolded mini-head: Keep slices dry → Pat thoroughly after rinsing to prevent steaming and soggy chips.
- Bolded mini-head: Watch for golden edges → Remove from oven promptly to prevent over-torched, bitter chips.
- Bolded mini-head: Space slices well → Overlapping slices cause uneven cooking; arrange in a single layer for best crunch.
- Bolded mini-head: Slightly underbake first → Chips firm up as they cool; err on the side of slightly softer for perfect crispness later.
- Bolded mini-head: Use parchment paper → Ensures easy release and even baking, avoiding sticking and sogginess.
- Bolded mini-head: Rest before serving → Let chips sit 2 minutes on a rack to crisp up fully for maximum crunch.
Common mistakes and how to fix them
- FORGOT to check chip color → Do a visual check for golden edges.
- DUMPED all slices on pan → Spread slices evenly, avoid overlapping for crispness.
- OVER-TORCHED chips → Remove as soon as edges are dark golden to prevent bitterness.
- MISSED resting time → Let chips rest 2 minutes to firm and crisp further.
Quick fixes and pantry swaps
- If/When chips aren’t crispy enough → Splash a little water on slices, pat dry, then bake longer.
- When chips are over-baked → Patch with fresh slices and reduce oven heat slightly.
- If chips stick to parchment → Shield with a light brush of oil on parchment for next batch.
- When chips turn dull → Rescue by re-baking at 180°C (350°F) for 2 minutes until crackling.
- Splash with lemon or vinegar to mask slight bitterness if chips are over-torched or dull.
Prep, store, and reheat tips
- Slice the cassava thin and dry thoroughly; these can be stored in an airtight container at room temperature for up to a day before baking. Keep away from moisture to maintain crispness.
- Unbaked slices can be refrigerated in an airtight container for up to 24 hours, but they may lose some of their initial crispness—best to bake fresh if possible.
- Baked chips are best enjoyed within 2 hours for maximum crunch. Store leftovers in an airtight container at room temperature for up to a day, but they will soften over time.
- Reheat chips in a 180°C (350°F) oven for 3–5 minutes until warm and crispy again. Keep an eye on them to prevent burning; listen for that crackle when they’re ready.
Top questions about baked cassava chips
1. How thin should I slice the cassava?
Slice thin enough to get crispy edges, about 1/8 inch, for best crunch.
2. Do I need to rinse the cassava slices?
Rinse slices in cold water to remove excess starch, then dry thoroughly before baking.
3. What’s the ideal oven temperature and baking time?
Bake at 180°C (350°F) until edges are golden and chips crackle when broken, around 15-20 minutes.
4. Can I bake these without parchment paper?
Use parchment paper to prevent sticking and ensure even crisping, no need to oil the pan.
5. How do I know when the chips are ready?
Chips are done when they’re golden, dry-looking, and crackle when you tap them.
6. How should I store baked cassava chips?
Store cooled chips in an airtight container for up to a day for maximum crunch.
7. How can I re-crisp leftover chips?
Reheat in a 180°C (350°F) oven for 3-5 minutes until warm and crispy again.
8. What is a common mistake during baking?
Overbaking makes chips bitter; remove as soon as edges turn golden to prevent this.
9. Can I add spices or herbs?
Add a sprinkle of smoked paprika or chili flakes for extra flavor; start small to avoid overpowering.
10. What tool helps get even slices?
Using a mandoline helps achieve even, thin slices for perfect crispness every time.
These baked cassava chips are a quiet testament to simpler ingredients and a bit of patience. The crackle and earthy aroma make them feel like a small, honest pleasure that’s easy to whip up anytime. It’s satisfying to know that you can turn humble roots into something crunchy and satisfying, without much fuss.
Whenever I make these, I’m reminded that good snacks don’t need to be complicated or greasy. They’re perfect for a casual afternoon or when you need a little crunch to pair with a lazy evening. Sometimes, the best recipes are the ones that bring us back to basics, with just a few honest ingredients.