Roasting garlic might seem like a small step, but it completely changes the game for chickpeas. The sweet, smoky aroma that fills the kitchen when garlic caramelizes slowly in the oven is addictive, and it adds a richness you just can’t get from raw or sautéed garlic. This recipe is about harnessing that transformation to turn a humble snack into something you’re craving all day long.
I stumbled on this idea during a busy week when I needed a quick, satisfying bite that felt a little special. Roasted garlic chickpeas become crispy, deeply flavorful, and so much more than the sum of their parts. It’s like a little pocket of comfort that’s portable, healthy, and oddly addictive—perfect for snack attacks or a quick topping for salads and bowls.
Focusing on the transformative power of roasting garlic before adding it to chickpeas, this recipe explores how caramelized garlic elevates a simple snack into a deeply savory, almost smoky experience, revealing how a small step can redefine comfort food.
The story behind this recipe
- One evening, I was rummaging through my pantry, craving something crunchy and savory but without the usual fuss. I remembered how roasting garlic once transformed a simple tomato sauce into something smoky and layered. That moment sparked the idea to see what would happen if I roasted garlic directly with chickpeas—turns out, magic. The garlic becomes sweet and mellow, almost oozing, and the chickpeas crisp up with a nutty, caramelized coating. It’s a humble dish, but the depth of flavor keeps pulling me back.
- This recipe isn’t about perfection or fuss; it’s about those small, honest moments in the kitchen that surprise you. Roasting garlic in the oven alongside chickpeas was a happy accident that made me realize how simple ingredients can become something richer, more complex. It’s a reminder that sometimes, the best bites come from just paying attention and letting things roast slowly—no rushing, no fuss, just good, honest food.
- heading: “The story behind this recipe”
Ingredient breakdown
- Olive oil: I like drizzling extra virgin olive oil over the chickpeas before roasting; it helps them crisp up and adds a fruity, peppery aroma. You can skip it for a lighter version, but they won’t be quite as crispy.
- Garlic: Roasting whole garlic bulbs until bubbling and golden brings out a sweet, mellow flavor that transforms the dish. If you prefer a milder garlic punch, roast it longer; for a sharper bite, roast it less.
- Chickpeas: Canned chickpeas are my go-to—they’re tender and quick. Rinse well to remove excess salt and skum. For extra crunch, dry them thoroughly before roasting; damp chickpeas steam instead of crisp.
- Salt: I season generously before roasting, but if you’re watching sodium, start with less and adjust after tasting. A sprinkle of flaky sea salt right out of the oven really enhances the flavor.
- Lemon juice: A squeeze of fresh lemon brightens everything—bright, zesty, almost zingy. Add it after roasting to keep that fresh punch, or skip if you want a milder, earthier flavor.
- Optional spices: I sometimes toss in smoked paprika or cumin for a smoky depth or a warm note. Keep it simple if you want the garlic and chickpeas to shine, but don’t shy from experimenting.
Spotlight on key ingredients
Garlic:
- When roasted, it becomes sweet, mellow, and almost buttery. Its aroma fills the kitchen with a warm, inviting scent and transforms from sharp to velvety.
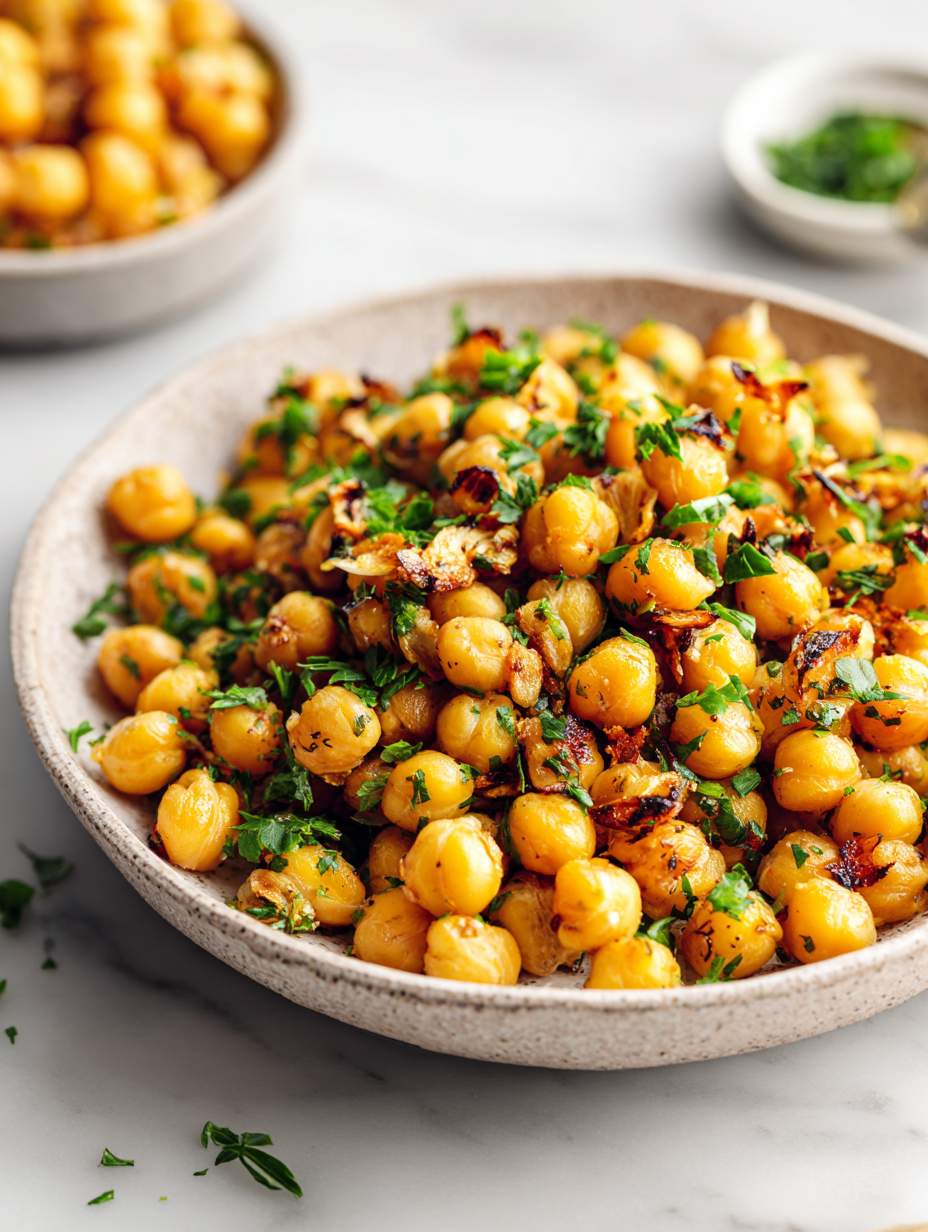
- Chickpeas: They turn golden and crispy, with a crackling exterior. Their nutty flavor deepens as they roast, taking on a slightly caramelized edge that makes each bite satisfying.
Chickpeas:
- Olive oil: It helps the chickpeas crisp up beautifully, adding a fruity aroma and a subtle pepperiness. It also aids in roasting the garlic to perfection, ensuring even caramelization.
- Lemon juice: Brightens the dish with its zesty, fresh punch. It’s best added after roasting to preserve its vibrant flavor and avoid bitterness, balancing the richness.
Notes for ingredient swaps
- Oil: Avocado oil works well for high heat and adds a buttery flavor, but olive oil keeps it familiar and bright.
- Garlic: Roasted shallots give a sweeter, milder profile—skip garlic if you prefer a subtler touch or want a milder aroma.
- Chickpeas: Use roasted or boiled chickpeas if canned aren’t available; they’ll still crisp but may have a different nutty flavor.
- Salt: Sea salt flakes add a nice crunch and burst of saltiness, but table salt offers a more uniform seasoning if you’re in a pinch.
- Lemon juice: Lime juice gives a slightly different citrus note—use it for a more tropical twist or omit for a richer, roasted flavor.
- Spices: Smoked paprika can replace cumin for a smoky kick, or add chili powder for extra heat—keep it simple if you want pure garlic flavor.
- Add-ins: Toss in fresh herbs like parsley or cilantro after roasting for bright freshness; dried herbs can burn in the oven, so add later.
Equipment & Tools
- Baking sheet: To roast chickpeas and garlic evenly in the oven.
- Small bowl: To mash and mix roasted garlic.
- Foil: To wrap garlic for roasting and contain the aroma.
- Towel: To thoroughly dry chickpeas for maximum crunch.
- Fork: To mash roasted garlic smoothly.
Step-by-step guide to roasted garlic chickpeas
- Preheat your oven to 200°C (400°F). Gather a baking sheet, a bowl, and a mixing spoon.
- Drain and rinse one 15 oz can of chickpeas. Pat them very dry with a towel—damp chickpeas won’t crisp well.
- Peel 1 whole head of garlic, breaking it into cloves. Toss the cloves with 1 tbsp olive oil, a pinch of salt, and a splash of water. Wrap loosely in foil.
- Spread the chickpeas evenly on the baking sheet. Drizzle with 1-2 tbsp olive oil, toss to coat thoroughly, then sprinkle generously with sea salt.
- Place the garlic foil packet and the chickpeas in the oven. Roast garlic for 35-40 minutes until soft, fragrant, and bubbling. Roast chickpeas for 25-30 minutes, shaking the pan halfway through.
- Check the garlic: it should be golden and soft, with a sweet aroma. Chickpeas should be golden and crispy at the edges, with a crackling sound when moved.
- Once done, let the garlic cool slightly. Squeeze the roasted garlic cloves out of their skins into a small bowl. Mash them with a fork until smooth.
- Toss the roasted garlic with the crispy chickpeas. Squeeze in a little lemon juice if you like a fresh zing. Mix well and taste for seasoning.
- Finish with a sprinkle of flaky sea salt or chili flakes if desired. Serve warm or at room temperature, as a snack or salad topping.
Allow the chickpeas and garlic to rest for 5 minutes after roasting. Toss with lemon juice and seasonings just before serving. Serve warm or at room temperature, preferably in a bowl to keep the crispness intact.
How to Know It’s Done
- Garlic cloves are soft, sweet, and slightly caramelized.
- Chickpeas are golden, crispy, and crackle when touched.
- The mixture smells rich with roasted garlic aroma, no raw garlic scent.
Roasted Garlic Chickpeas
Ingredients
Equipment
Method
- Preheat your oven to 200°C (400°F). Gather a baking sheet, small bowl, foil, towel, and fork.
- Drain and rinse the chickpeas, then pat them very dry with a towel until they feel rough and powdery—this helps them crisp better.
- Peel the garlic bulb, breaking it into individual cloves. Toss the cloves with 1 tablespoon olive oil and a pinch of salt, then wrap loosely in foil.
- Spread the chickpeas evenly on the baking sheet, drizzle with another tablespoon of olive oil, and sprinkle generously with sea salt. Toss gently to coat all the chickpeas in oil and salt.
- Place the foil-wrapped garlic and the chickpeas in the oven. Roast the garlic for 35-40 minutes until soft, fragrant, and bubbling, and roast the chickpeas for 25-30 minutes, shaking the pan halfway to ensure even browning.
- Once the garlic is golden and soft, remove it from the oven and let it cool slightly. Squeeze the roasted garlic cloves out of their skins into a small bowl, then mash with a fork until smooth and velvety.
- Check the chickpeas—they should be golden, crispy, and crackling when you stir them. Remove from the oven and let them cool for a few minutes.
- Toss the roasted garlic with the crispy chickpeas, squeezing fresh lemon juice over the mixture for brightness. Gently stir to combine and season further with salt or spices if desired.
- Serve the roasted garlic chickpeas warm or at room temperature in a bowl. Enjoy their savory, smoky crunch as a snack or topping for salads and bowls.
Tips and tricks for perfect roasted garlic chickpeas
- Use a high oven temperature to get chickpeas crispy, around 200°C (400°F).
- Toss chickpeas well with oil and salt before roasting for even crunch and flavor.
- Wrap garlic in foil to trap heat and promote slow caramelization without burning.
- Shake the baking sheet halfway through roasting to ensure even browning on all sides.
- Check chickpeas: they should crackle when moved and be golden, not burnt or pale.
- Let garlic cool slightly before squeezing out of skins to avoid burns and get a smoother mash.
- Toss roasted garlic with hot chickpeas immediately to absorb flavors and enhance richness.
Common mistakes and how to fix them
- FORGOT to dry chickpeas thoroughly → They won’t crisp without proper dryness.
- DUMPED the garlic directly into the oven → Roast garlic wrapped or in foil for even caramelization.
- OVER-TORCHED the chickpeas → Remove early if they turn dark or smell burnt to prevent bitterness.
- UNDER-seasoned before roasting → Taste salt at the end; adjust to enhance flavor and crunch.
Quick fixes and pantry swaps
- When chickpeas are too soft, reduce roasting time and dry them thoroughly beforehand.
- Splash a little lemon juice or vinegar if the garlic turns out flat or dull in flavor.
- Patch burnt chickpeas by scooping out the unburnt parts and roasting again for extra crunch.
- Shield garlic from direct oven heat if it starts to over-torch, and lower the temperature slightly.
- Rescue dull flavor by tossing with fresh herbs or a dash of hot sauce just before serving.
Prep, store, and reheat tips
- Prep the chickpeas and garlic a day ahead; keep the dry chickpeas in an airtight container in the pantry and the roasted garlic in a small jar in the fridge. The garlic develops a richer, mellow flavor overnight.
- Store leftover roasted chickpeas in an airtight container in the fridge for up to 3 days. They may lose some crispness but will retain flavor—toss them in a hot skillet to revive crunch.
- Reheat in a 180°C (350°F) oven for 5-7 minutes until warmed and crispy again. The aroma of roasted garlic will reappear, making them feel fresh.
- For longer storage, freeze roasted chickpeas in a sealed bag for up to a month. Thaw at room temperature and re-crisp in the oven for best texture.
- The flavors deepen over time, so expect a slightly more mellow, caramelized garlic taste the next day. Reheating will bring back the smoky aroma and crunch, but some aroma may fade after storage.
Top questions about roasted garlic chickpeas
1. What makes roasted garlic different from raw garlic?
Roasted garlic adds a sweet, mellow, and slightly smoky flavor that deeply enhances the chickpeas’ nuttiness. It’s all about that caramelized aroma filling your kitchen.
2. Why aren’t my chickpeas crispy?
If your chickpeas aren’t crispy enough, make sure they’re thoroughly dried before roasting and shake the pan halfway through for even browning.
3. How do I prevent garlic from burning?
Roasting garlic slowly in foil preserves its natural sweetness and prevents burning, giving it that rich, velvety texture and aroma.
4. Can I use dried chickpeas instead of canned?
Use good quality canned chickpeas, rinse thoroughly, and dry them very well. They should feel dry and slightly powdery before roasting for maximum crunch.
5. Should I add lemon before or after roasting?
Adding lemon juice after roasting brightens the dish with zesty freshness. It’s best to squeeze it on warm chickpeas to let the flavor soak in.
6. Can I omit oil or use a different one?
Yes, you can swap olive oil for avocado or sesame oil. Just remember, these oils might add a different aroma or flavor, but they still help crisp up the chickpeas.
7. What should roasted garlic look and smell like?
Roasted garlic becomes soft, sweet, and almost butter-like. During roasting, it bubbles and smells intensely fragrant—like warm, toasted garlic bread.
8. What if my chickpeas burn?
If chickpeas are over-torched and taste bitter, remove them immediately, lower oven temp, and check more frequently next time.
9. How do I get perfectly crispy chickpeas?
Use a high oven temperature (around 200°C/400°F) and shake the pan halfway to ensure even crispness and prevent burning.
10. How should I store and reheat leftovers?
Store leftovers in an airtight container in the fridge for up to 3 days. Refresh their crunch by reheating in a hot oven or skillet.
This dish is a reminder that simple ingredients, when treated with patience and care, can become something truly memorable. The smoky aroma of roasted garlic and the crispy, nutty chickpeas make a snack that’s hard to put down, especially when you get that perfect balance of crunch and mellow sweetness.
In a world obsessed with quick fixes, these roasted garlic chickpeas prove that a little extra time and attention can elevate everyday snacks into something a little more special. Whether you’re nibbling alone or sharing with friends, they’re sure to spark a few happy bites and maybe even a little kitchen nostalgia.